|
| |
Note: the following is only an example. You need to replace all
the sample information with your own information if you want this to work on your own computer!
Please make sure that you have gone through all the steps in How to run a WEBcam site before you continue here!
To run a local WEBcam site you must be running your own local web server. If you wonder
how people will ever be able to find your WEBcam site, read up on DIPS at http://postmodem.com/dips-admin/.
With DIPS you'll be able to get a permanent URL for your WEBcam site that will always
resolve to your local web server whenever you are online! Furthermore, you need the
following information:
 | The root directory of your local website. For this example I will
assume that the root directory is C:\WWW\. |
| We will assume that we want to keep a history of 10
captured pictures. |
- Choose the menu Setup|WEBcam:
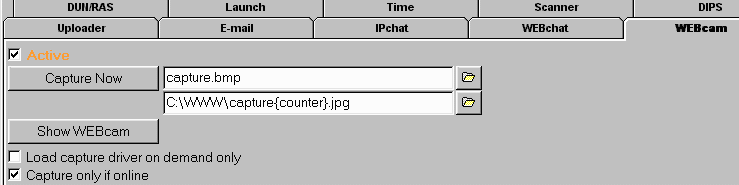
Check the Active box and enter C:\WWW\capture{counter}.jpg
into the JPEG field. Then you click the OK button to save this information.
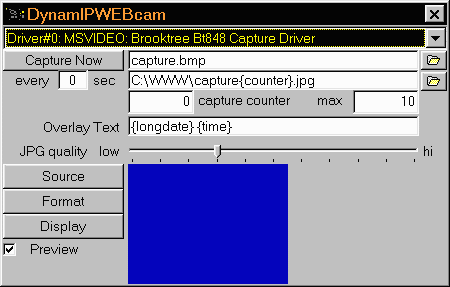
- Choose the menu Tools WEBcam and enter the
following information:
- Choose the menu Setup|Uploader and enter the
following information:
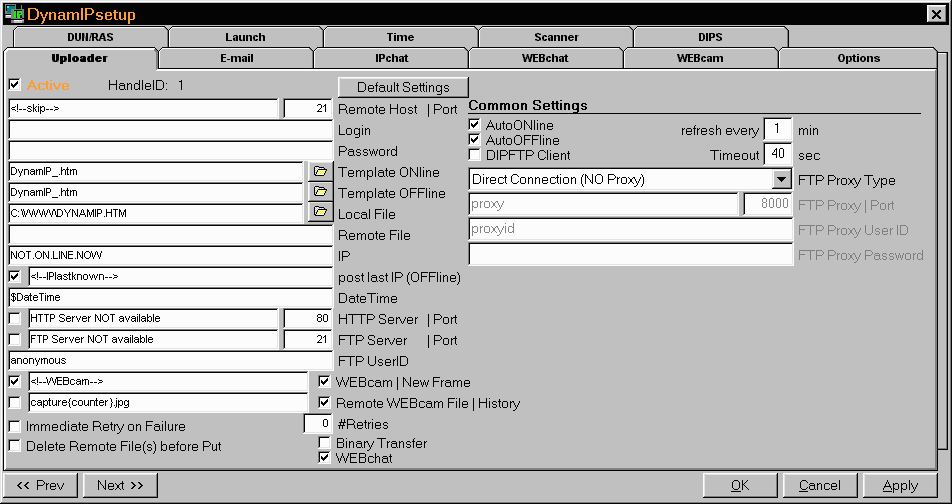
The value <!--skip--> in the field Remote Host tells DynamIP not to upload
any files using FTP (since all files are stored locally, there is really no need to FTP
files to a remote server!). The value C:\WWW\DYNAMIP.HTM
in Local File tells DynamIP to
store the update file into the root directory of your local web server. Note that the
filename in Remote WEBcam File, capture{counter}.jpg,
must be equal to the setting in Setup|WEBcam (the JPEG
file). DynamIP replaces the tag <!--WEBcam-->
in the template with an image tag that points to the JPEG file (and that's why DynamIP
must know the name of the capture file - the path is ignored, only the filename is
important). Checking the box tells DynamIP to generate
hyperlinks to the last few captured frames.
- Click the OK button, go online, and give it a try.
The above setup will update the WEBcam picture every 1
minute and you should see the updated web page DYNAMIP.HTM
and the WEBcam picture capture{counter}.jpg
({counter} will be replaced with the sequence number, e.g. capture4.jpg!) in your
directory C:\WWW.
A sample page is available here.
The DynamIP Uploader can do many more tricks. Check out the detailed setup instructions for the Uploader.
Last modified: April 05, 1999
OFFLINEvisitors since May 1, 1998
|